Berkeley's Garden 1 ~ ElephantEats.com

Happy Mother’s Day to all you moms out there! I hope you’re able to spend some time with your children today. Sadly my mom is in Florida (she was here a couple weeks ago), but we’re lucky enough to have Nate’s mom stay over and obviously I’ll have little Berkeley with me!…unless he has other plans?

Berkeley's Garden 3 ~ ElephantEats.com

Berkeley LOVES being outside. Now that he’s sleeping through the night and on an actual schedule during the day, we’ve actually had time to do things, and being outside has been a priority with this gorgeous spring weather. Prior to his sleep training, we spent the majority of his awake time in his room playing…it didn’t help that the weather was cold. Now that it’s warm, though, we’ve been out taking walks, enjoying the front porch, or sitting in our yard.

Berkeley's Garden 4 ~ ElephantEats.com

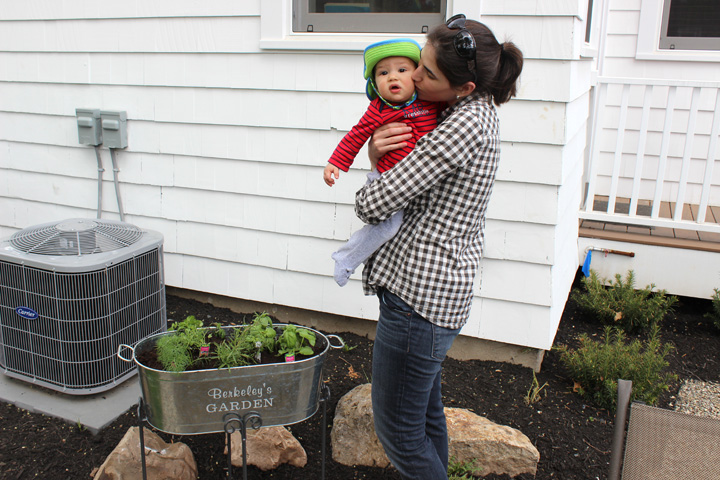
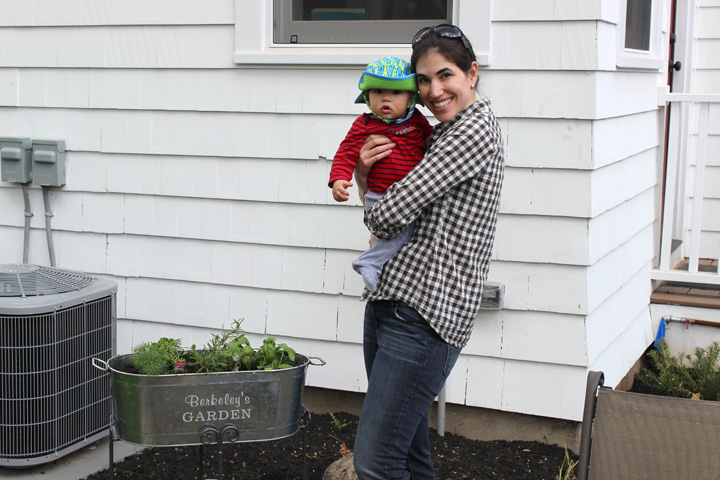
This Sunday will be my first Mother’s Day as an actual mom (did being a cat mom count?), and this is also our first spring in our new house with a little one!  One thing I’ve been wanting to do in our backyard is plant an herb garden. We hired out some landscaping last year, but last summer I was a tired pregnant lady with no energy for my own projects. Now that I finally have time to cook again, having fresh herbs right outside my back door would be so nice! Once I master herbs, I’m going to move on to vegetables. I want Berkeley to grow up knowing where the things he eats come from.

Berkeley's Garden 5 ~ ElephantEats.com 

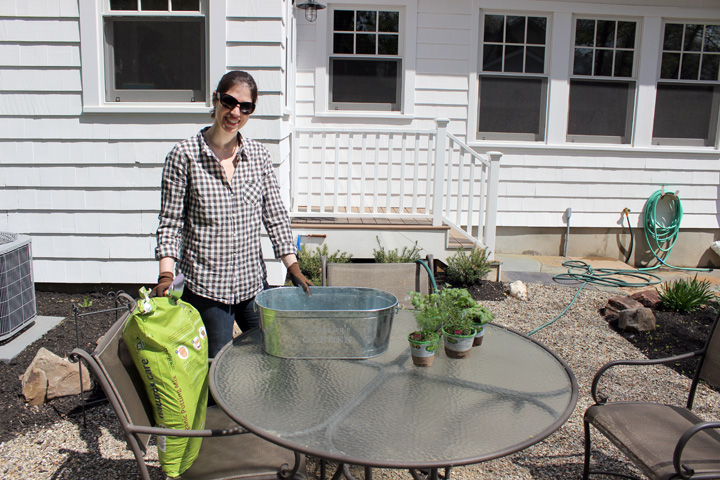
I had been procrastinating planting the garden because I’m lazy I needed to go out and buy some sort of container, soil, etc, so when Personal Creations reached out to me as part of their #LoveGrowsHere movement and offered me anything from the “Garden” section of their website, I jumped at the opportunity! I ended up selecting a Galvanized Metal Planter on a stand and I even got to have it personalized :) They offered me this gift not with a requirement to blog about it, but simply to help inspire a blog post of me and Berkeley outside in the fresh spring air working on a beautiful garden space, and that’s exactly what they did!

 Berkeley's Garden 6 ~ ElephantEats.com

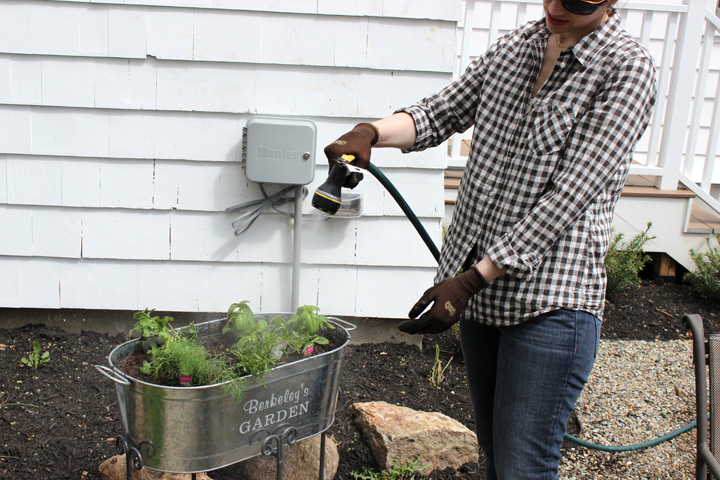
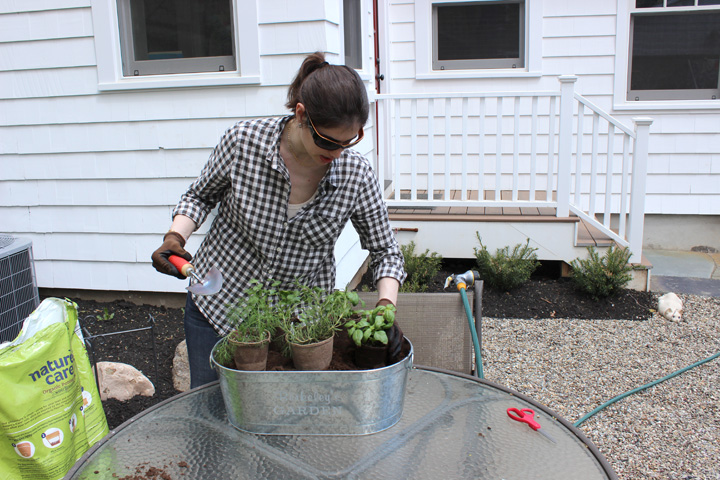
The planter arrived and was EXACTLY what I had been imagining for my herb garden. I went to Home Depot and got some Potting Mix (I read it’s better for herbs than potting soil), garden gloves and a spade, and all my favorite fresh herbs- basil, dill, cilantro and rosemary. The planter didn’t have any drainage in it, which I had read is crucial for growing herbs, so I simply drilled a bunch of holes in the bottom of the container. It was really easy.

Berkeley is a little young to help with the planting of the garden since he puts everything he touches in his mouth, so he was more of a bystander on this project. Hopefully next summer he can help me plant some veggies!

Berkeley's Garden 2 ~ ElephantEats.com

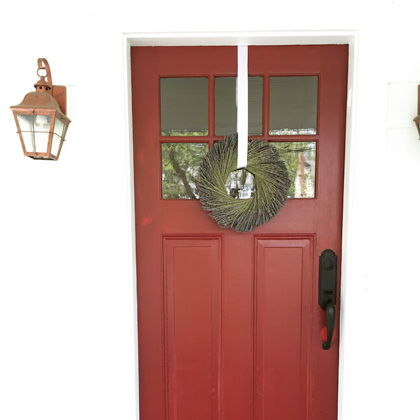
Personal Creations also let me pick out a plant or two from their sister site, ProPlants, to help with my project. They sadly didn’t carry any herbs, but I instead selected a gorgeous lavender wreath (which for some reason I can’t find on their site anymore) for my front door. It came packaged really well so it arrived in one piece- something not easy to do with dried flowers! It smells SOOOOOOOOOOOOOOOO good and totally brightens our door :)

ProPlants.com Lavender Wreath ~ ElephantEats.com


Well, I’ve been doing some cooking but I haven’t had the energy to take out my camera, so no food pics for you this week. But I do want to share that I made a Wild Rice Mushroom Soup that was seriously amazing and then I happened to stumble upon another great recipe- Tortellini with Italian Sausage, Fennel and Mushroom. I highly recommened you guys make both of them…YUM. Unless you don’t like mushrooms, sorry!

I’ll be back soon with a recipe but in the meantime I thought I’d share some things with you :)

First, our new roof is on! We went with the “Slate” grey color. It was the second darkest color other than black. It’s much darker than the previous roof, which I’m happy about. Here’s the “before:”

Roof "before" ~ ElephantEats.com

And the “after:”

Exterior New Roof Timberline Ultra Series Slate ~ ElephantEats.com

They were roofing the day I took the pic, hence the garbage sitting on the roof. It will look a lot darker once we get the house repainted I think. Also, there was frost on the roof which is also making it appear lighter than it actually is. And yes, I did blur out the info on the giant sign in our yard in case you were wondering.

Apparently the framing inside the house is complete now and the subs (the electrician, plumber and Heating/AC guy) are there working this week. It’s moving along!

In other news…

So in addition to making Nate’s mom granola for Christmas, I also painted a new cat portrait for my blogger friend, Emma! She had inquired about commissioning a portrait for a while but finally decided to tell her boyfriend about it so he could take matters into his own hands and turn it into a pseudo surprise xmas present. 

Custom Cat Portrait "Beata" ~ by ElephantEats.com

Emma has been wanting me to paint her kitty, Beata. I have to say that Beata is one of the most beautiful and photogenic cats I’ve ever seen! It also helped that Emma’s boyfriend sent me a great pic to work from. He told me that it was very important that I capture Beata’s “milk stain” lip and white paws, as they are her trademarks. Also, she has the most beautiful blue eyes!

Custom Cat Portrait "Beata" ~ by ElephantEats.com

I know I say this every time, but I think this is seriously my favorite portrait I’ve done so far! The picture I had to work from was such good quality that I even decided to attempt the background, instead of doing my usual solid color. I also chose to wrap the painting around the sides.

Custom Cat Portrait "Beata" ~ by ElephantEats.com

Custom Cat Portrait "Beata" ~ by ElephantEats.com

I got this kind of varnish to put on top and protect the painting and I stupidly got the “satin” instead of “matte” finish, making it shiny and hard to photograph. Actually the best pic I got was with my iphone before I put that varnish on:

Custom Cat Portrait "Beata" ~ by ElephantEats.com

I’m happy to say that Emma loved her Christmas present! Emma, you’ll have to let me know if Beata approves too ;)

Zesty Roasted Pumpkin Seeds ~ ElephantEats.com

If you’ve been following my blog, you know that for the last few years, I’ve been really getting into pumpkin carving at Halloween. I had seen these really cool pumpkins online and thought “i could do that,” so I picked up some wood-carving tools and was on my way!

Two years ago, I did a “Where the Wild Things Are” pumpkin:

Where the Wild Things Are jack-o-lantern ~ ElephantEats.com

My 2011 “Where the Wild Things Are” jack-o-lantern

Last year was an owl in honor of our wedding (in which there was a real owl!).

I, sadly, missed winning Movita’s Carve-Off 2012 competition by a hair!

Owl jack-o-lantern ~ ElephantEats.com

My 2012 owl jack-o-lantern

Now that I’ve had 2 years to hone my pumpkin-carving skills, I think that I did my best one yet!

Movita actually posted a link on her facebook page  to the Maniac Pumpkin Carvers last week. I had never been to their page before, but when I looked thru their SERIOUSLY AWESOME pumpkins, I saw that the Wild Things pumpkin I had found on pinterest two years ago (that inspired mine) was actually theirs. 

Nightmare Before Christmas jack-o-lantern ~ ElephantEats.com

I wanted to pick up some pumpkin carving tips, so I actually emailed them (not expecting a response) to find out A) where they cut the hole in their pumpkins since it’s obviously not the top and B) how they light them so well.

Nightmare Before Christmas jack-o-lantern ~ ElephantEats.com

Well, they wrote back like immediately which made me so excited. I found out that they actually cut a hole in the back of the pumpkin, which is what I did this year.

Nightmare Before Christmas jack-o-lantern ~ ElephantEats.com

 They also told me they rig it up with LED or CFL lights inside the pumpkin…but I didn’t have time to get the lights, so I just stuck a flashlight in my pumpkin and called it a day :)

Nightmare Before Christmas Jack Skellington jack-o-lantern ~ ElephantEats.com

My 2013 “Nightmare Before Christmas” Jack Skellington jack-o-lantern

We also finally remembered to use the tripod to take pics this year, since that’s really the only way to get a good pic of anything in the dark.

Nate carved the Oogie Boogie Man to go along with the “Nightmare Before Christmas” theme. I don’t know how we’re going to top these pumpkin next year. 

Nightmare Before Christmas jack-o-lantern ~ ElephantEats.com

*I’ve updated this post to include a few pumpkin carving tips:

  1. Find a pumpkin with a nice wide, flat-ish surface on the part you’re going to carve.
  2. Cut a hole in the backside of your pumpkin that’s big enough for your hand to fit through. Remove all the seeds (and save them to eat!) and then scrape away all the stringy pumpkin gook.
  3. Find an image. It’s best to work from an image that’s in black and white. Either find one that is already b+w or convert it with some photo-editing software. Pixlr.com is a good one and I think picmonkey.com might be able to do it too. 
  4. Use dry-erase or washable markers to sketch out the image on your pumpkin
  5. Get some wood carving tools, knives, or any other instruments you think will help with scraping the flesh off your pumpkin- some of these need to have small points as you might have intricate details to scrape.
  6. This is kind of obvious, but the lightest areas on your inspiration image will be the parts that you scrape/carve the deepest.
  7. I don’t actually ever cut all the way through the pumpkin flesh- the light areas are simply scraped quite deep into the flesh.
  8. Start with scraping/carving out the lightest areas on your pictures so you have a reference of how deep the lightest areas are compared to not scraping at all (the darkest areas) and then you can estimate how far to scrape for the in-between gray areas.
  9. When you think you’re done, take one of those pumpkin scooper tools they sell in the pumpkin carving sets and scrape the inside of the pumpkin behind your design as much as you can. This will ensure that there isn’t much flesh between the inside and your “lightest” areas. Your design will show better this way because when you put the light inside, it will be able to shine through best.
  10. Either rig up a light bulb or put a mini flashlight in your pumpkin. The little pumpkin lights they sell in the store aren’t bright enough to shine through a “scraped” pumpkin enough to really show off your design.
  11. That’s it! Now light up the pumpkin and impress all your friends!

Since we had two huge-ass pumpkins, I was able to get quite a few pumpkin seeds from them. Roasting pumpkin seeds has been a tradition in my house since I was little whenever we carved Jack-o-Lanterns. When I made them the first year I knew Nate, he became obsessed with them and now he looks forward to pumpkin carving for the seeds more than for the pumpkin I think :)

Last year I saw a Rachel Ray recipe that recommended boiling the seeds before roasting them. I decided to give it a try and they came out great! So I thought I’d share that recipe with you today. Enjoy!

Zesty Roasted Pumpkin Seeds ~ ElephantEats.com 

Zesty Roasted Pumpkin Seeds
Crispy, salty, spicy seasoned pumpkin seeds!
Write a review
Print
Ingredients
  1. 1 cup cleaned raw whole pumpkin seeds
  2. 1 tablespoon plus 1 tsp fine sea salt
  3. 1 tablespoon olive oil
  4. 1 tsp garlic powder
  5. 1 tsp onion powder
  6. a pinch cayenne
  7. 1 tsp worcestershire sauce
Instructions
  1. Preheat the oven to 375 degrees .
  2. In a small saucepan, bring 4 cups water, the seeds and 1 tbsp. salt to a boil. Simmer for 10 minutes, then drain. Pat the seeds dry between layers of paper towels.
  3. Toss the seeds with the olive oil and remaining 1 tsp. salt. Spread in a single layer on a greased foil-lined baking sheet. Roast until golden, 10 to 12 minutes (or possibly a little longer).
  4. Toss with one of the seasoning blends at right and roast for 5-10 minutes more or until crispy. Keep an eye on them because they burn fast!
Adapted from http://www.rachaelraymag.com/recipe/oven-roasted-pumpkin-seeds/
https://elephanteats.com/

DIY Dinosaur Planter ~ ElephantEats.com

This post, while being a how-to, is really more to give you a fun idea for a present, since I’m sure you could figure out how to make it like I did. 

A dinosaur planter is a great decor idea for your dino-obsessed child’s bedroom…or makes a cool desk adornment for your dino-obsessed 30-something year old husband :)

I made this gift to go along with Nate’s bigger birthday present that I got him- a glass blowing lesson! 

I had gotten the idea to make this after seeing something similar sold on the website theplaidpidgeon.com:

Stanley the Stegosaurus

They were charging $30 for this baby, plus shipping, and of course being the cheap DIY-er that I am, i asked myself the question that I seem to ask myself quite frequently, “why would I pay for that when I could make it for half the price?!”

Well, in the end mine ended up costing about $15 (if you don’t count the extra $10 I paid for the wrong size plant I bought, that I couldn’t return). Plus, it was made with love <3

I’ll admit mine isn’t quite as nice as the inspiration piece, because the dino wasn’t deep enough to hide the planter, but I think it’s still pretty cool. You could easily find a better, deeper dino but I had a limited selection in my over-priced nyc toy store. I imagine Toys ‘R Us probably has some cheaper dinos.

I wasn’t sure I’d be able to find an appropriate dinosaur for my project. The inspiration picture seemed to be a dinosaur made of hard plastic, but I knew I had no tools good enough for carving such a thing. I was on the lookout for something softer, but sturdy enough to stand up on its own.

DIY Dinosaur Planter ~ ElephantEats.com

After checking out a couple toy stores, I finally found this dino for $10 at Mary Arnold Toys on the Upper East Side. I thought $10 was a little steep for something about 4″ high, but what can you do. I mean, this was a birthday present after all.

To get started I estimated about how big the succulent plant I saw at the floral store was (about 2″ in diameter) so i would know how big a hole to cut.

Then I set my little dino on her side, stroked her little head and told her I was sorry. A single tear rolled down her scaley cheek. I wiped it away and performed a small operation to remove a chunk of her back. 

DIY Dinosaur Planter ~ ElephantEats.com

 **No actual dinosaurs were harmed during the making of this project**

She was fine- no blood at all. In fact, this dino happened to be filled with stuffing, so I took the stuffing out of the middle part but left it in the head and tail pieces so she didn’t completely deflate.

DIY Dinosaur Planter ~ ElephantEats.com

DIY Dinosaur Planter ~ ElephantEats.com

Since I was told the plant needs to breathe and needs drainage, I put the planter in the bottom of a little cup. This way you can pour out any excess water that drains by taking the cup out, since the inside of the dino would be harder to clean.

And then I surprised the birthday boy with a little dinosaur buddy he could share his desk with.

According to Nate, she (apparently it’s a girl)is  currently “guarding his inbox:”

Braised Chicken with Artichokes and Olives ~ ElephantEats.com

Whelp, I’m back. I know I disappeared for a bit, but so much has been going on.

This past weekend I saw a few of my childhood friends (you might remember them from my visit to Cleveland), and I got to give two of them, who happen to be married, a blanket I made for their second child who’s due in June. It was my first time sewing a blanket, as opposed to crocheting, and it definitely came out a little crooked. I realize you can’t tell unless you really stare at it though, so whatever.

IMG_7638sm

I order these little tags to sew into the lining. On one side it says “Handmade by Amy Carota <3” and on the back it has washing instructions. So cute, right?! The blanket is a white fleece on one side and just a cute fabric on the other, with a satin trim. I’m excited to try to make another one soon, so hopefully another of my friends will get preggo :)

IMG_7637sm

Today, I officially had my last day at work! I said my goodbyes to everyone, and they even got a Carvel ice cream cake for me. Yum :)

I spent Wednesday morning looking at a couple houses, because I could. It was the last time I could really take off part of a weekday, since I start my new job on Monday. Saturday I’m going to look at MORE houses (10 I believe). I think I must be setting a record with the amount of houses I’ve seen in the last 3 weeks. I definitely know the things I do and don’t want, though, which makes it extra hard since I’m picky!

Braised Chicken with Artichokes and Olives ~ ElephantEats.com

As you might imagine, I haven’t had much time to cook, and thus to share yummy recipes with you. I did manage to make us this meal last night. It was something I pinned a few weeks ago and finally got around to making.

I loved the combination of flavors and ingredients. They definitely aren’t ones I find myself eating often. It had the perfect balance of protein and veggies  (and carbs since I served it over brown rice). The spices are really delicious and unique.

Braised Chicken with Artichokes and Olives ~ ElephantEats.com

I made this after I got home from work, so unlike the Tomato Quiche, you could easily make this for a weeknight meal ;)

Hopefully I’ll be back soon with a cookie recipe I baked up this week too!

Braised Chicken with Artichokes and Olives ~ ElephantEats.com

Braised Chicken with Artichokes and Olives

From The Longevity Kitchen via Epicurious

Print this recipe!

Serves 4-6

8 boneless, skinless chicken thighs- about 1.5 pounds (you MUST use thighs or they’ll dry out)
salt
Freshly ground black pepper
3 tablespoons extra-virgin olive oil
1 yellow onion, diced
3 cloves garlic, thinly sliced
1 teaspoon turmeric
1/2 teaspoon ground cumin
1/2 teaspoon ground coriander
Generous pinch red pepper flakes
1 cinnamon stick, or 1/4 teaspoon ground cinnamon
1 bay leaf
2 cups chicken broth
2 teaspoons grated lemon zest
3 tablespoons freshly squeezed lemon juice
1 cup canned chickpeas, drained, rinsed, and mixed with a spritz of lemon juice and a pinch of salt
8 thawed frozen or jarred artichoke hearts (see note), quartered
1/2 cup pitted green olives, such as picholine or manzanilla (I used pimento stuffed ones because that’s all I could find)
2 teaspoons lemon zest
2 tablespoons chopped fresh mint or cilantro (I used mint)

Pat the chicken dry and season salt and pepper. Heat the olive oil in a Dutch oven or heavy soup pot over medium-high heat. Add the chicken, working in batches if necessary, and cook until well browned on each side, about 3 minutes per side. Transfer to a plate.

Decrease the heat to medium. Add the onion and a pinch of salt and sauté until soft and slightly golden, about 5 minutes. Add the garlic and sauté for 1 minute. Add the turmeric, cumin, coriander, red pepper flakes, cinnamon stick, and bay leaf and cook, stirring constantly, until fragrant, about 1 minute.

Pour in 1/4 cup of the broth to deglaze the pot, stirring to loosen any bits stuck to the pot. Stir in a pinch of salt and cook until the liquid is reduced by half. Stir in the remaining 1 3/4 cups of broth, the lemon zest, and 2 tablespoons of the lemon juice. Decrease the heat to medium-low, cover, and simmer for 15 minutes.

Add the chicken, chickpeas, artichoke hearts, and olives and stir gently to combine. Increase the heat to medium-high and simmer uncovered, stirring occasionally, until the chicken is heated through, about 5 minutes. Stir in the remaining tablespoon of lemon juice. Taste; you may want to add another squeeze of lemon juice or pinch of salt.

Garnish with the mint.

Note:
The artichokes hearts can be fresh, frozen and thawed, or packed in water in a jar. Whichever type you use, rinse them well. If using fresh artichoke hearts, add them right after adding the garlic.

Variation: This dish would work well using a firm white fish, such as 1 pound halibut, cut into 4 ounces pieces, in place of the chicken. Begin the recipe by sautéing the onion. Proceed as directed, but substitute vegetable broth, homemade or store-bought, for the chicken broth. Add the fish during the last 5 minutes of cooking.