Light Carrot Dill Cream Sauce for Pasta ~ ElephantEats.com

First of all, let me say that Nate is officially back! Unfortunately there’s still no job, but he’s back nonetheless. While I’m happy to have him back, it was nice to have a fairly empty fridge rather than one stocked to the brim with Trader Joes. Have I mentioned the boy can eat?!

So I took it upon myself to clean out the refrigerator a bit before his arrival. During my cleaning I came across a bag of baby carrots that Nate had bought and never opened. Nate had given me a list of food to get for him before he got home and baby carrots was on it. He claimed the ones in the fridge, though unopened, were no longer edible.

Light Carrot Dill Cream Sauce for Pasta ~ ElephantEats.com

I wasn’t about to waste those carrots! Have you noticed that I’m big on not wasting? :) So when I was deciding on some sort of sauce to make for my homemade farfalle, I knew I wanted to include carrots. Plus, carrots scream Spring to me, and now that daylight savings has come and gone, I know the new season is right around the corner.

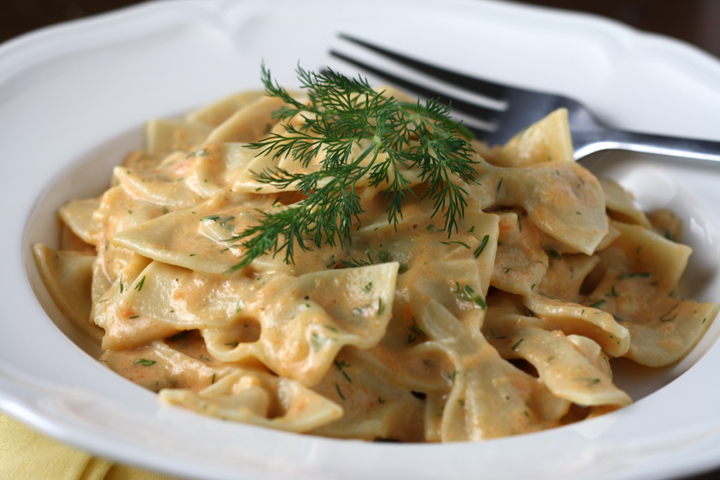
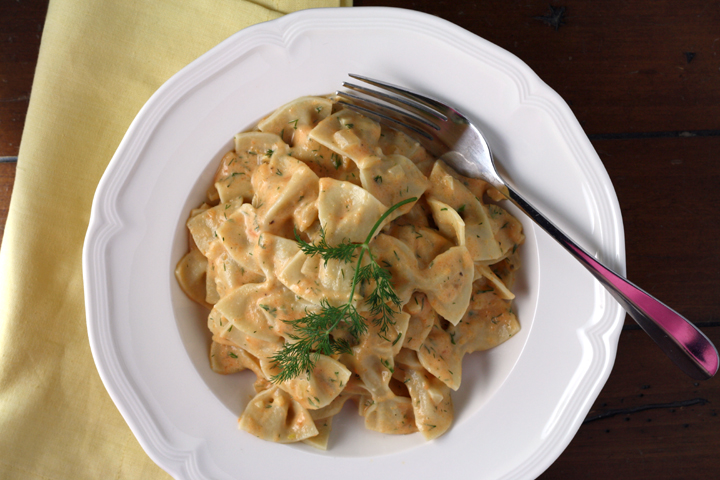
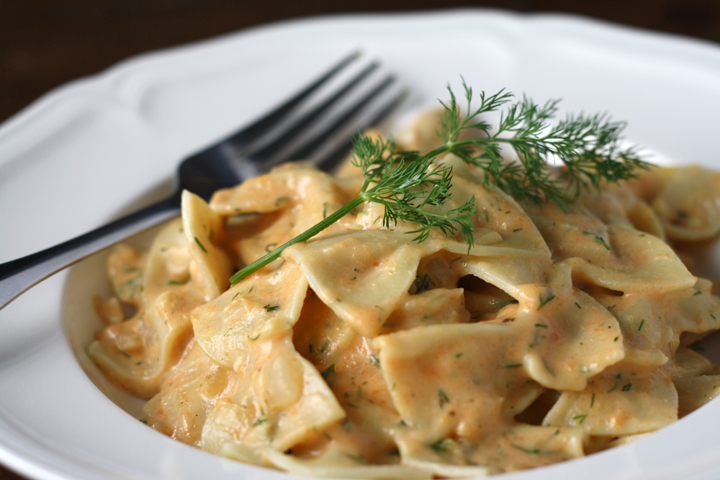
Farfalle is good with a cream sauce, so I decided I’d use the carrots pureed in a cream sauce, and then the addition of dill was a no-brainer for a fresh, light taste perfect for Spring!

This sauce is actually very low in calories for a cream sauce. I used carrots to bulk it up and thicken it, and it contains only low-fat milk, not cream. You’d never know from the taste though, the onions, garlic and lemon give it so much flavor!

Light Carrot Dill Cream Sauce for Pasta ~ ElephantEats.com

This recipe made about 3.5 cups of sauce. I found that 3/4 cup of sauce was plenty for the 6 oz of pasta that my farfalle recipe made.

6 oz is three proper servings….but in our household, 6 oz of pasta serves one Nate. So rather than making more pasta, I ate some of the sauce over spaghetti squash and it was delicious for what it was (I.e not pasta).

How beautiful is the color of this sauce? I just think it’s so perfect for Spring :)

Since this recipe made so much, I’m thinking I might use the rest of it in a lasagna. Maybe I’ll layer some zucchini and mozzarella in there? Yum!

Light Carrot Dill Cream Sauce for Pasta ~ ElephantEats.com

Light Carrot Dill Cream Sauce 

Print this recipe!

Yields 3.5 cups 

2 cups baby carrots (about 11 oz)
1 Tbsp butter
1 medium onion, diced
3 cloves garlic, minced
3 Tbsp flour
1 3/4 cup 1% milk, divided
3 oz. light cream cheese
1/2 cup fresh dill, chopped
juice of 3/4 lemon
salt (start with 1/2 tsp) and pepper

Bring a pot of water to boil. Add carrots and cook 15 minutes or until soft when pierced. Remove carrots to bowl of food processor but leave water on a low boil so you can cook the pasta later.

Melt butter in the bottom of a medium saucepan. Saute onions until soft. Add garlic and cook another minute.

Whisk in 1/2 cup milk and the flour until smooth. Whisk in 1 cup more milk and bring to a boil, whisking often. When it comes to a boil, reduce to simmer and cook until it thickens enough to coat the back of a spoon.

Add cream cheese to milk mixture and whisk til melted. Remove from heat and stir in dill. Set aside.

Add pasta to boiling water.

While pasta is cooking, puree carrots and 1/4 cup milk in a food processor until smooth. Add to milk mixture along with lemon juice, salt and pepper.

When pasta is done, drain and add sauce. (I found that 3/4 cup sauce covers 6 oz of pasta perfectly. So that means a pound of pasta should use about 2 cups sauce). However I recommend making a full recipe…the sauce is just so good!

It was about time for a Daring Bakers Challenge that was more fun and less annoying/frustrating/want-to-throw-all-my-baking-supples-out-the-window.

For January we were put to the scone making test! Although in this case, “scone” meant the European scone, which is actually called a biscuit in America. And biscuits in America are scones in Europe.

Backwards, right?

Anyway, we were allowed to put whatever fixins’ we wanted into the mix and I went with dill and cheddar, since I had both in my fridge. They suggested to use chives and cheddar but i’m glad I went with dill.

I served it alongside the veggie soup from the other night and they were just perfect…flaky, fluffy, flavorful, cheesy. Make these tonight!

Blog-checking lines: Audax Artifex was our January 2012 Daring Bakers’ host. Aud worked tirelessly to master light and fluffy scones (a/k/a biscuits) to help us create delicious and perfect batches in our own kitchens!


Cheddar Dill Biscuits

Print this recipe!

Makes 5-8 depending on biscuit size

Recipe can be doubled

Ingredients:
1 cup (240 ml) (140 gm/5 oz) plain (all-purpose) flour
2 teaspoons (10 ml) (10 gm) (⅓ oz) fresh baking powder
¼ teaspoon (1¼ ml) (1½ gm) salt
1/4 tsp baking soda
1/2 tsp mustard powder
2 tablespoons (30 gm/1 oz) frozen grated butter (or a combination of lard and butter)
approximately ½ cup (120 ml) cold milk
1/2 cup grated cheese
2 Tbsp chopped fresh dill
optional 1 tablespoon milk, for glazing the tops of the scones

Preheat oven to very hot 475°F/240°C/gas mark 9.

Triple sift the dry ingredients into a large bowl. (If your room temperature is very hot refrigerate the sifted ingredients until cold.)

Rub the frozen grated butter (or combination of fats) into the dry ingredients until it resembles very coarse bread crumbs with some pea-sized pieces if you want flaky scones or until it resembles coarse beach sand if you want tender scones.

Add nearly all of the liquid at once into the rubbed-in flour/fat mixture and mix until it just forms a sticky dough (add the remaining liquid if needed). The wetter the dough the lighter the scones (biscuits) will be! Mix in cheese and dill.

Turn the dough out onto a lightly floured board, lightly flour the top of the dough. To achieve an even homogeneous crumb to your scones knead very gently about 4 or 5 times (do not press too firmly) the dough until it is smooth. To achieve a layered effect in your scones knead very gently once (do not press too firmly) then fold and turn the kneaded dough about 3 or 4 times until the dough has formed a smooth texture. (Use a floured plastic scraper to help you knead and/or fold and turn the dough if you wish.)

Pat or roll out the dough into a 6 inch by 4 inch rectangle by about ¾ inch thick (15¼ cm by 10 cm by 2 cm thick). Using a well-floured 2-inch (5 cm) scone cutter (biscuit cutter), stamp out without twisting six 2-inch (5 cm) rounds, gently reform the scraps into another ¾ inch (2 cm) layer and cut two more scones (these two scones will not raise as well as the others since the extra handling will slightly toughen the dough). Or use a well-floured sharp knife to form squares or wedges as you desire.

Place the rounds spaced widely apart on the baking dish. Glaze the tops with milk if you want a golden colour on your scones or lightly flour if you want a more traditional look to your scones.

Bake in the preheated very hot oven for about 10 minutes (check at 8 minutes since home ovens at these high temperatures are very unreliable) until the scones are well risen and are lightly coloured on the tops. The scones are ready when the sides are set.

Immediately place onto cooling rack to stop the cooking process, serve while still warm.

I check out tons of blogs on a daily basis, both for enjoyment, and to get recipe inspiration. You can see the blogs I follow regularly under my Blogs I Follow Tab at the top of the page.

In my blog surfing, I often come across blogs I’ve never seen before that I absolutely love. Anyway, the other day I was doing my reading and stumbled upon a blog called Pass the Sushi and was immediately drawn to the Creamy Chicken and Pasta Salad recipe she had posted that she got from Food Network Magazine.


For some reason when I looked at it, I immediately got a craving for a tuna noodle pasta salad. I guess that’s the last time I’ve had small noodles like she used in a pasta salad. Also, I’m not a huge fan of chicken, or cooking it, so I thought canned tuna was the perfect alternative. 

I slightly altered the recipe to make it a little more tangy, and it totally hit the spot! It’s perfect for these hot summer nights when you just want something cold to eat.


Tuna Pasta Salad
Adapted Food Network magazine

Print this recipe!

Serves 5-7

Ingredients:

10 ounces tubetti or other small tube-shaped pasta1 1/4 cups 2% Greek yogurt (or mix of 2% and 0%)
1/2 cup light mayo
1/4 cup water
2 tsp apple cider vinegar
2 Tbsp dijon mustard
1/2 cup chopped fresh dill
1 Tbs chopped fresh chives or scallions
2 tsp salt
2 5-oz cans chunk light tuna in water, drained
2 stalks celery, finely chopped
1 English cucumber, quartered lengthwise, then each piece halved lengthwise again (i.e. cut into 1/8ths), then seeded and diced
Freshly ground black pepper
8 cups mesclun greens
1/3 cup dried cranberries

Bring a pot of salted water to a boil. Add the pasta and cook as the label directs. Drain and rinse under cold water to stop the cooking.

Meanwhile, whisk the yogurt, mayonnaise, 1/4 cup water, the vinegar, mustard, dill, chives, and salt in a medium bowl. Add the celery and cucumber to the dressing and gently stir to combine. Dump in the drained tuna, breaking up if there are big chunks, and stir to combine

Shake the excess water from the pasta and add it to the tuna salad. Season with pepper and toss. Serve over greens with cranberries sprinkled on top.