
As I said in my last post, my husband is gone for the next few weeks, and as much as I want to spend every day cooking things I love (that I know he hates), a girl can only eat so much.
And so, while I’m finishing up some leftovers, I’m going to share a tutorial of the signs I made for my wedding.
But first I want to tell you that our wedding is going to be featured on the awesome wedding blog Green Wedding Shoes!!! I’m so so excited. It’s not going to be til March, but I’ll be sure to post the link when it happens.
(Here’s where I shared some wedding photos, in case you missed)

courtesy Jodi Miller Photography
Anyway, I had seen lots of wedding signage around the internet, but I got it in my head that I wanted my signs to be made out of an old picket fence.
Lucky for me, I found one laying on the side of the street on my way home from work one day. I stood there mentally calculating how to dismember the partially deconstructed fence and then tried to figure out how I’d carry the pieces to my apartment that was a couple blocks away. The superintendent of the building that discarded the fence saw me assessing the goods. I told him that it was for a project for my upcoming wedding,and he asked if I wanted a newer fence he had in the basement.

courtesy Jodi Miller Photography
I told him that I actually preferred the old, decaying fence to the new one he was offering, and I saw in his eyes that he obviously took me for an idiot. Despite that, however, he offered to take the old fence apart for me and remove the nails. As he spent the next 15-20 minutes dismembering the fence, he told me that he too was engaged, and that his wife would kill him if she knew he was helping someone else on their wedding project instead of helping with his own wedding :)
I offered to pay him for his troubles but he refused. I walked away with exactly what I had been searching for, and I can’t tell you how happy I was. I think I grinned the whole way home.
If you can’t find an old fence to do this with (which really adds to the rustic charm), I guess you could try distressing some wood yourself, although it’s way more effort. You can easily find people giving away old fences on Craigslist.
Anyway, here’s what I did:
First I went to home depot and got some wooden posts that are 2 in (i think?) square and like 8-10 feet long. I had home depot cut them for me into sign height. Sorry I don’t have the exact info- I couldn’t find the item on their website. You’ll see it, thought, if you go to their lumber area. It’s basically the smallest size lumbar you’ll see.
I took some walnut stain and brushed it on, then wiped the excess off with a towel. I wanted them to have a brownish finish, so I used Walnut stain. I used a weatherproof spray polyurethane on top, once the stain was dry.
Next, I took the filthy picket fence outside and hosed it down. I wanted it to look weathered, but not dirty. I then let it dry for a day, since the old wood really absorbed the water.
I found a font I liked and printed out the words I wanted so they were almost as tall as the fence was wide- I wanted about 1/4-1/2″ space above and below the words. I placed the longest word I needed on the fence to see how long I should cut them. I centered it and left some room on each side. I then cut all the fence pieces to this length, using a hand saw.
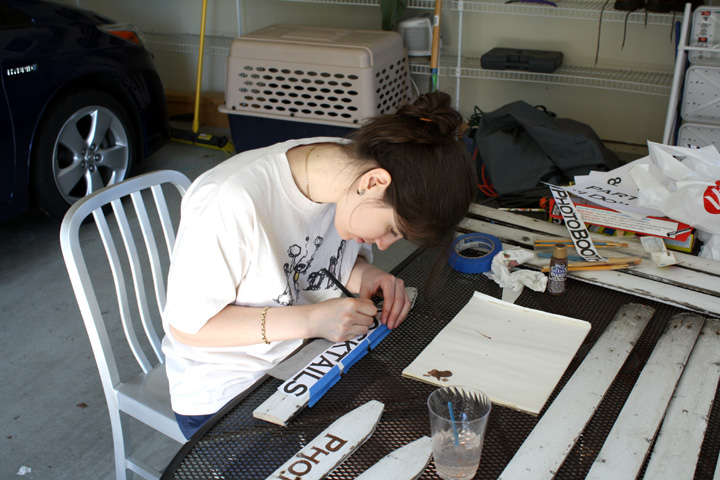
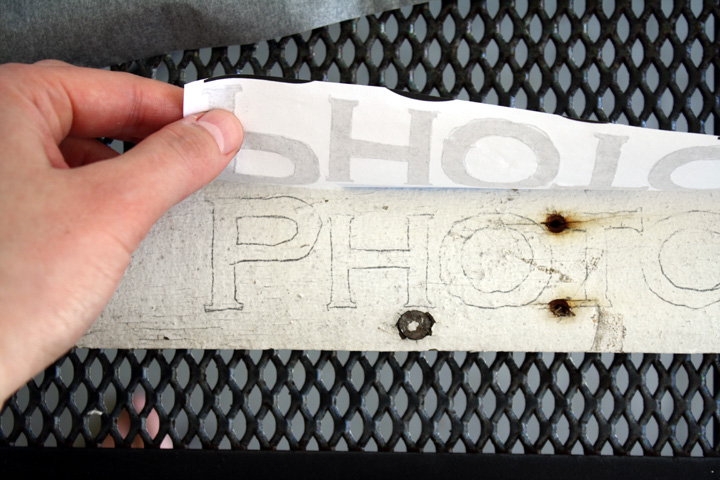
Next I arranged the pieces facing the directions I wanted (depending on where they needed to point in real life), and one at a time I traced over the letters using transfer paper.


I then VERY carefully painted within the lines with a teeny brush and some craft paint. I had to go over each letter twice because the paint wasn’t very thick- definitely annoying. If you do this, test the paint somewhere to see it’s coverage and use a more expensive, thicker paint if you can, to save yourself some time.
Once everything was dry, I gave them all 2-3 coats of the weatherproof poly spray, allowing several hours in between each coat. I’m pretty impatient so I probably didn’t wait as long as I should have, but I knew these wouldn’t be outdoors for more than a day, and it most likely wouldn’t rain.
Then I arranged the signs on each post the way I liked and, since the wood was old and I didn’t want it to splinter, I drilled a pilot hole through both the sign and post. I then screwed them together with some deck screws that were slightly shorter than the fence + post combined thickness.
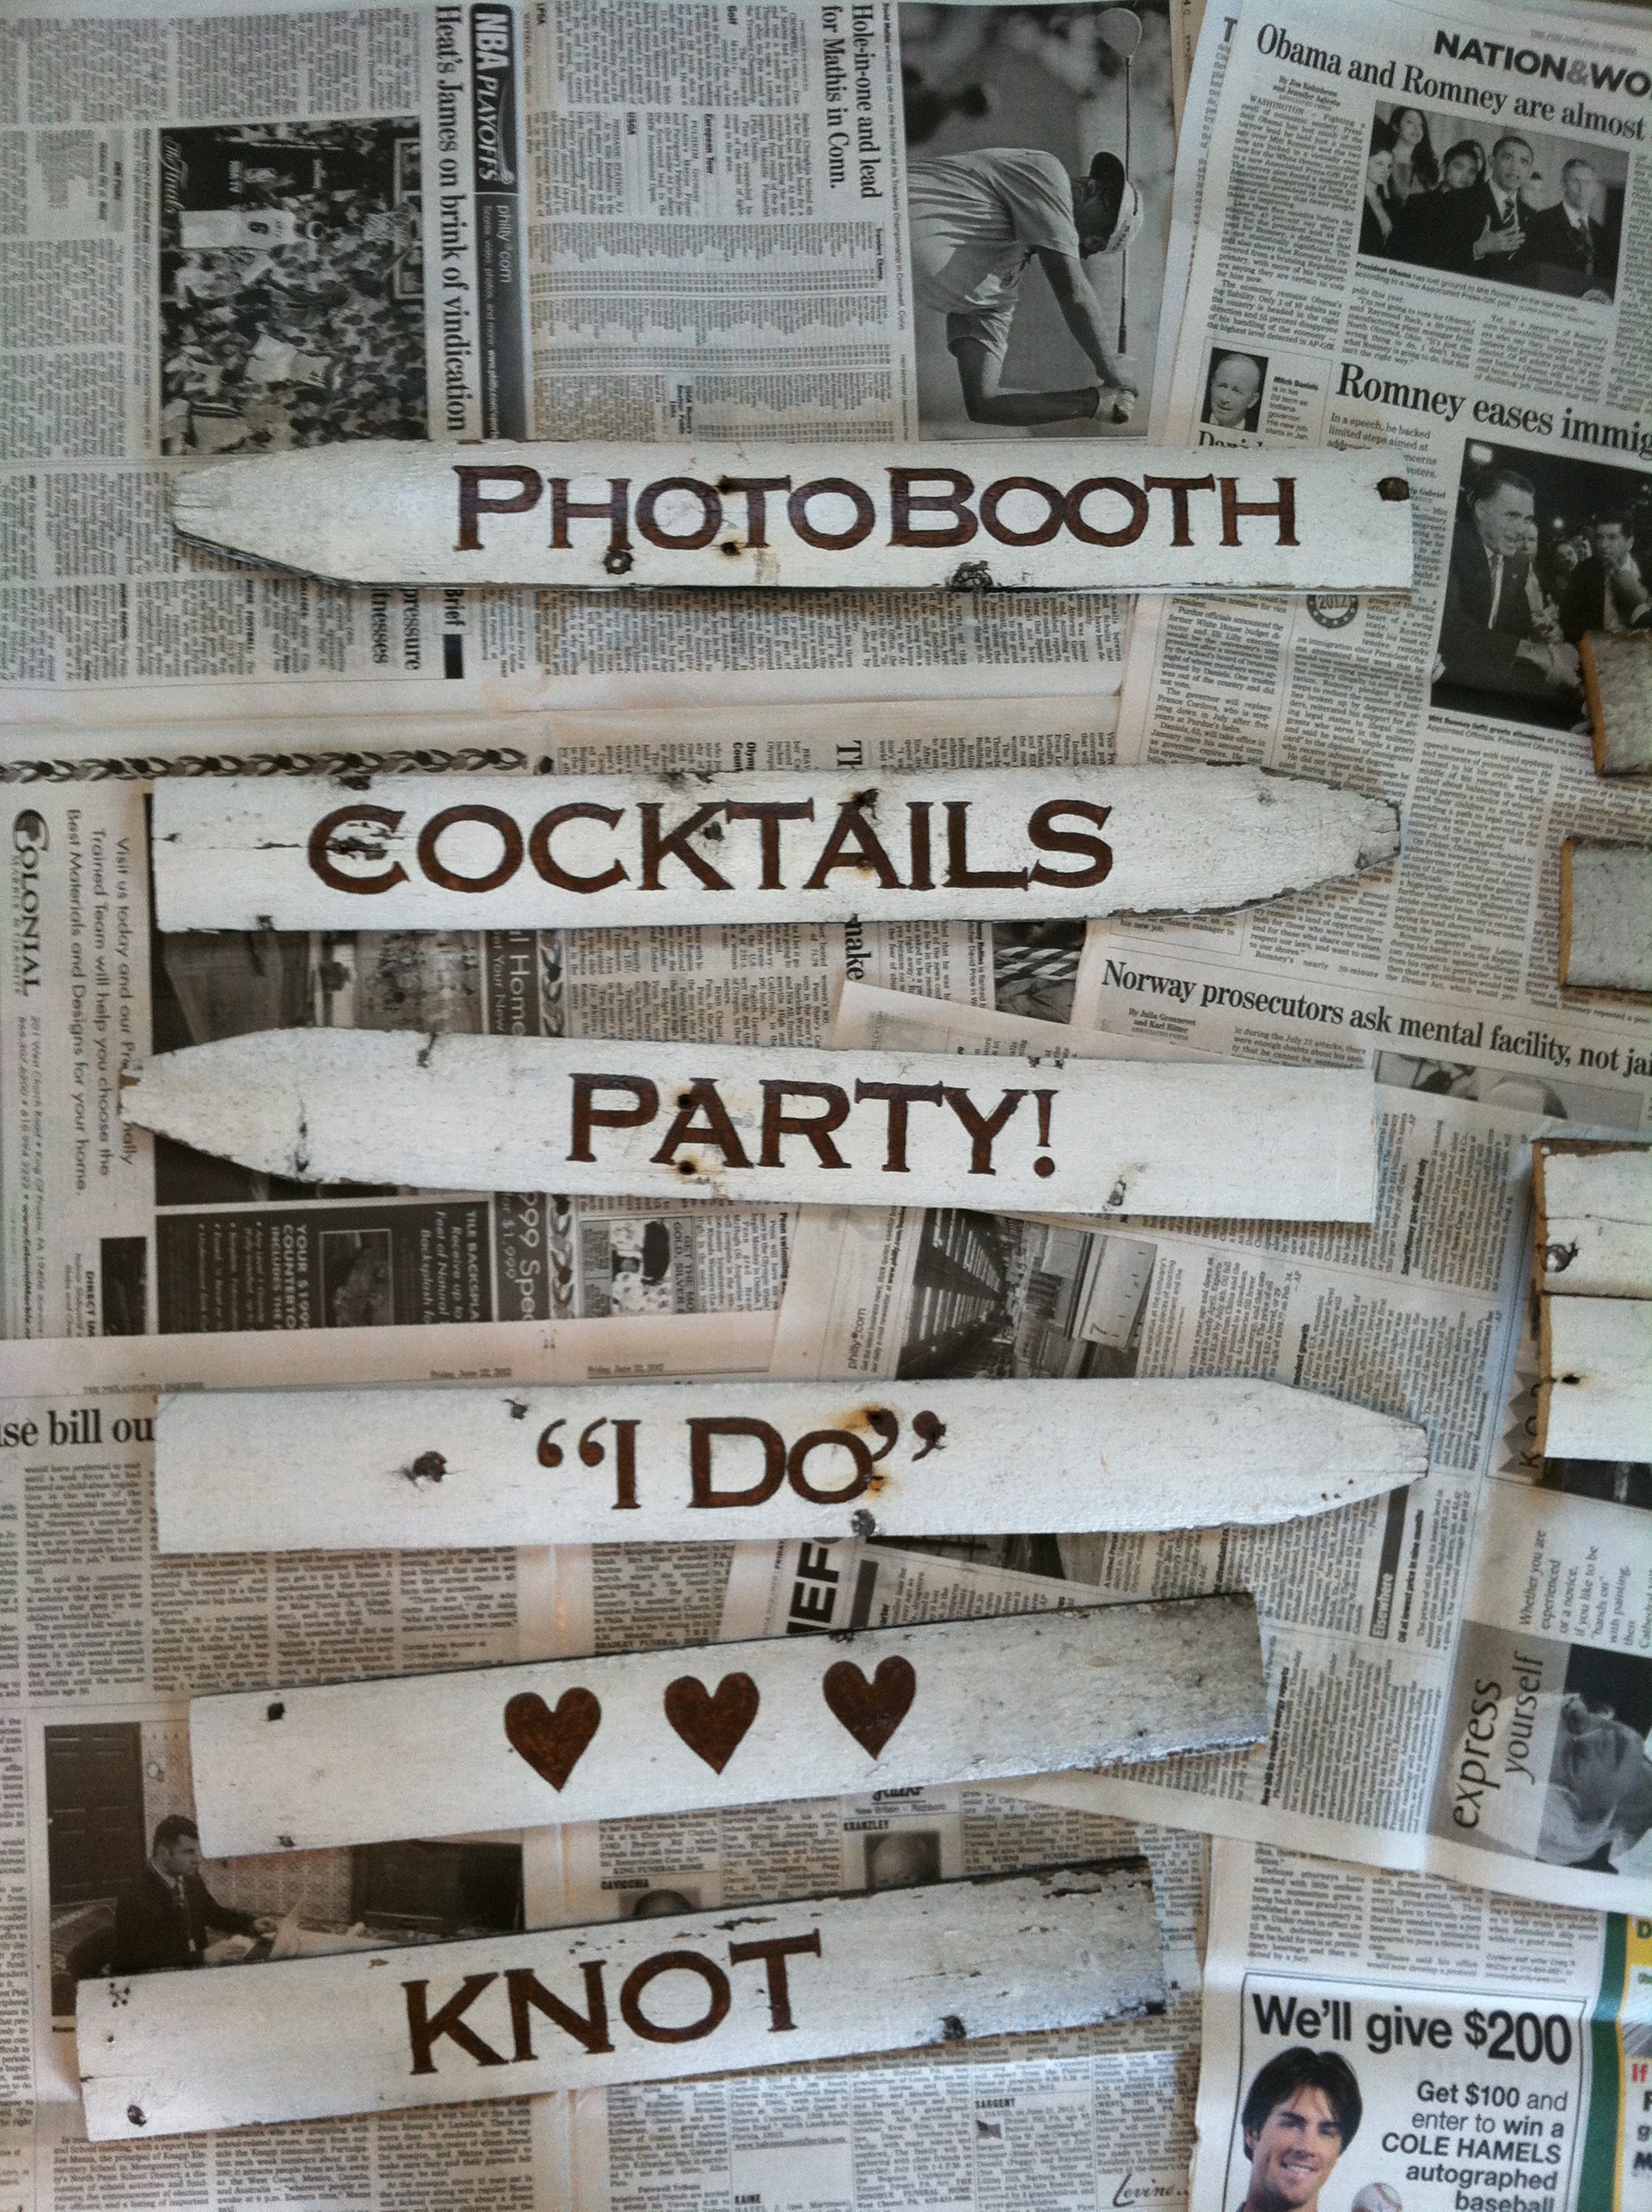
And, done! I completely love how they turned out :)
I put several non-directional signs leading down the driveway that said “Amy & Nate” “Tie the Knot” “10-21-12 <3.” They were spaced about 10-20 feet apart.
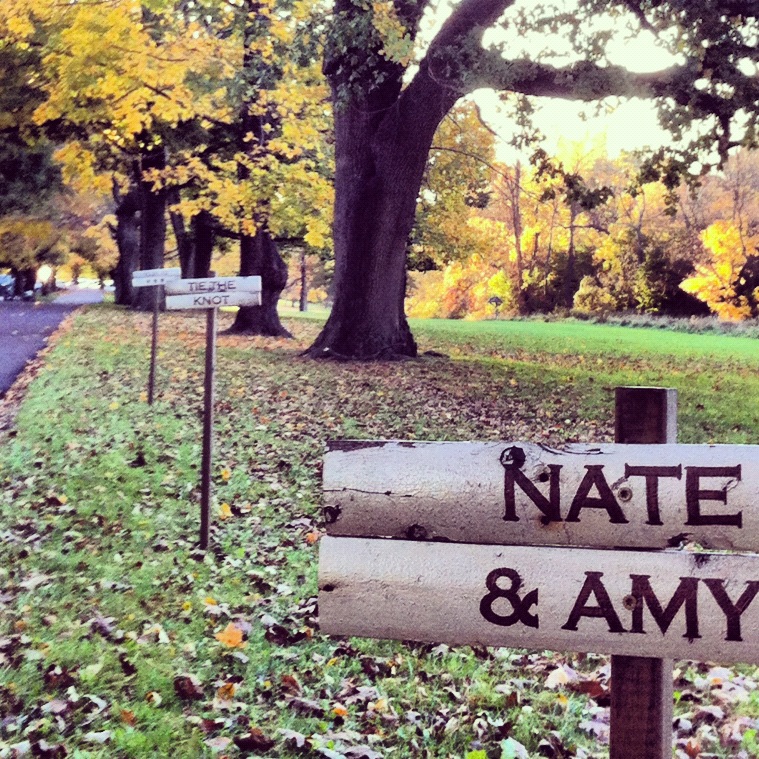
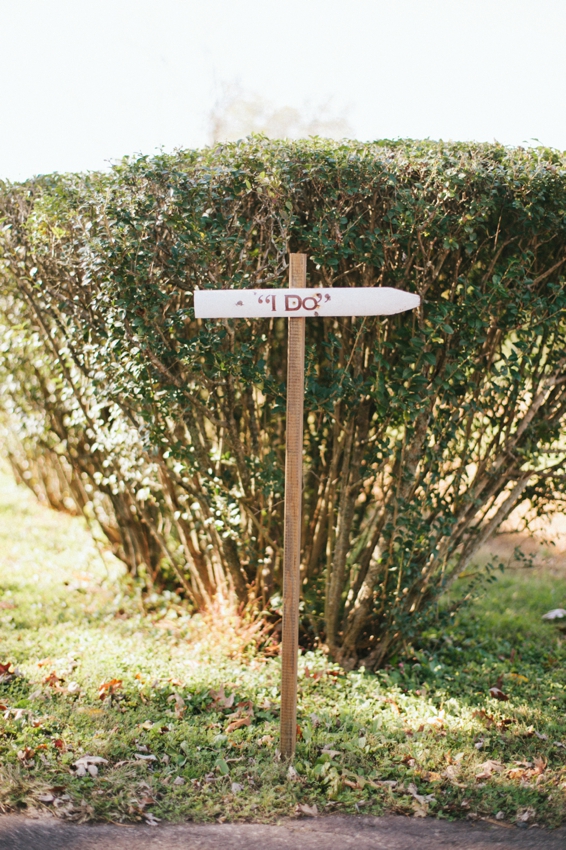
Then I had one directional sign (first picture of the post), since not everything was in the same building.
And finally I had an “I Do” sign in front of the orchard where the ceremony was held.
courtesy Jodi Miller Photography
I had so many fence pieces left over that I used them for one more project! Here’s a sneak peek- My how-to will come soon.

courtesy Jodi Miller Photography


